Meet Pip the Penguin:

How to Draw Pip the Penguin: A Step-by-Step Guide
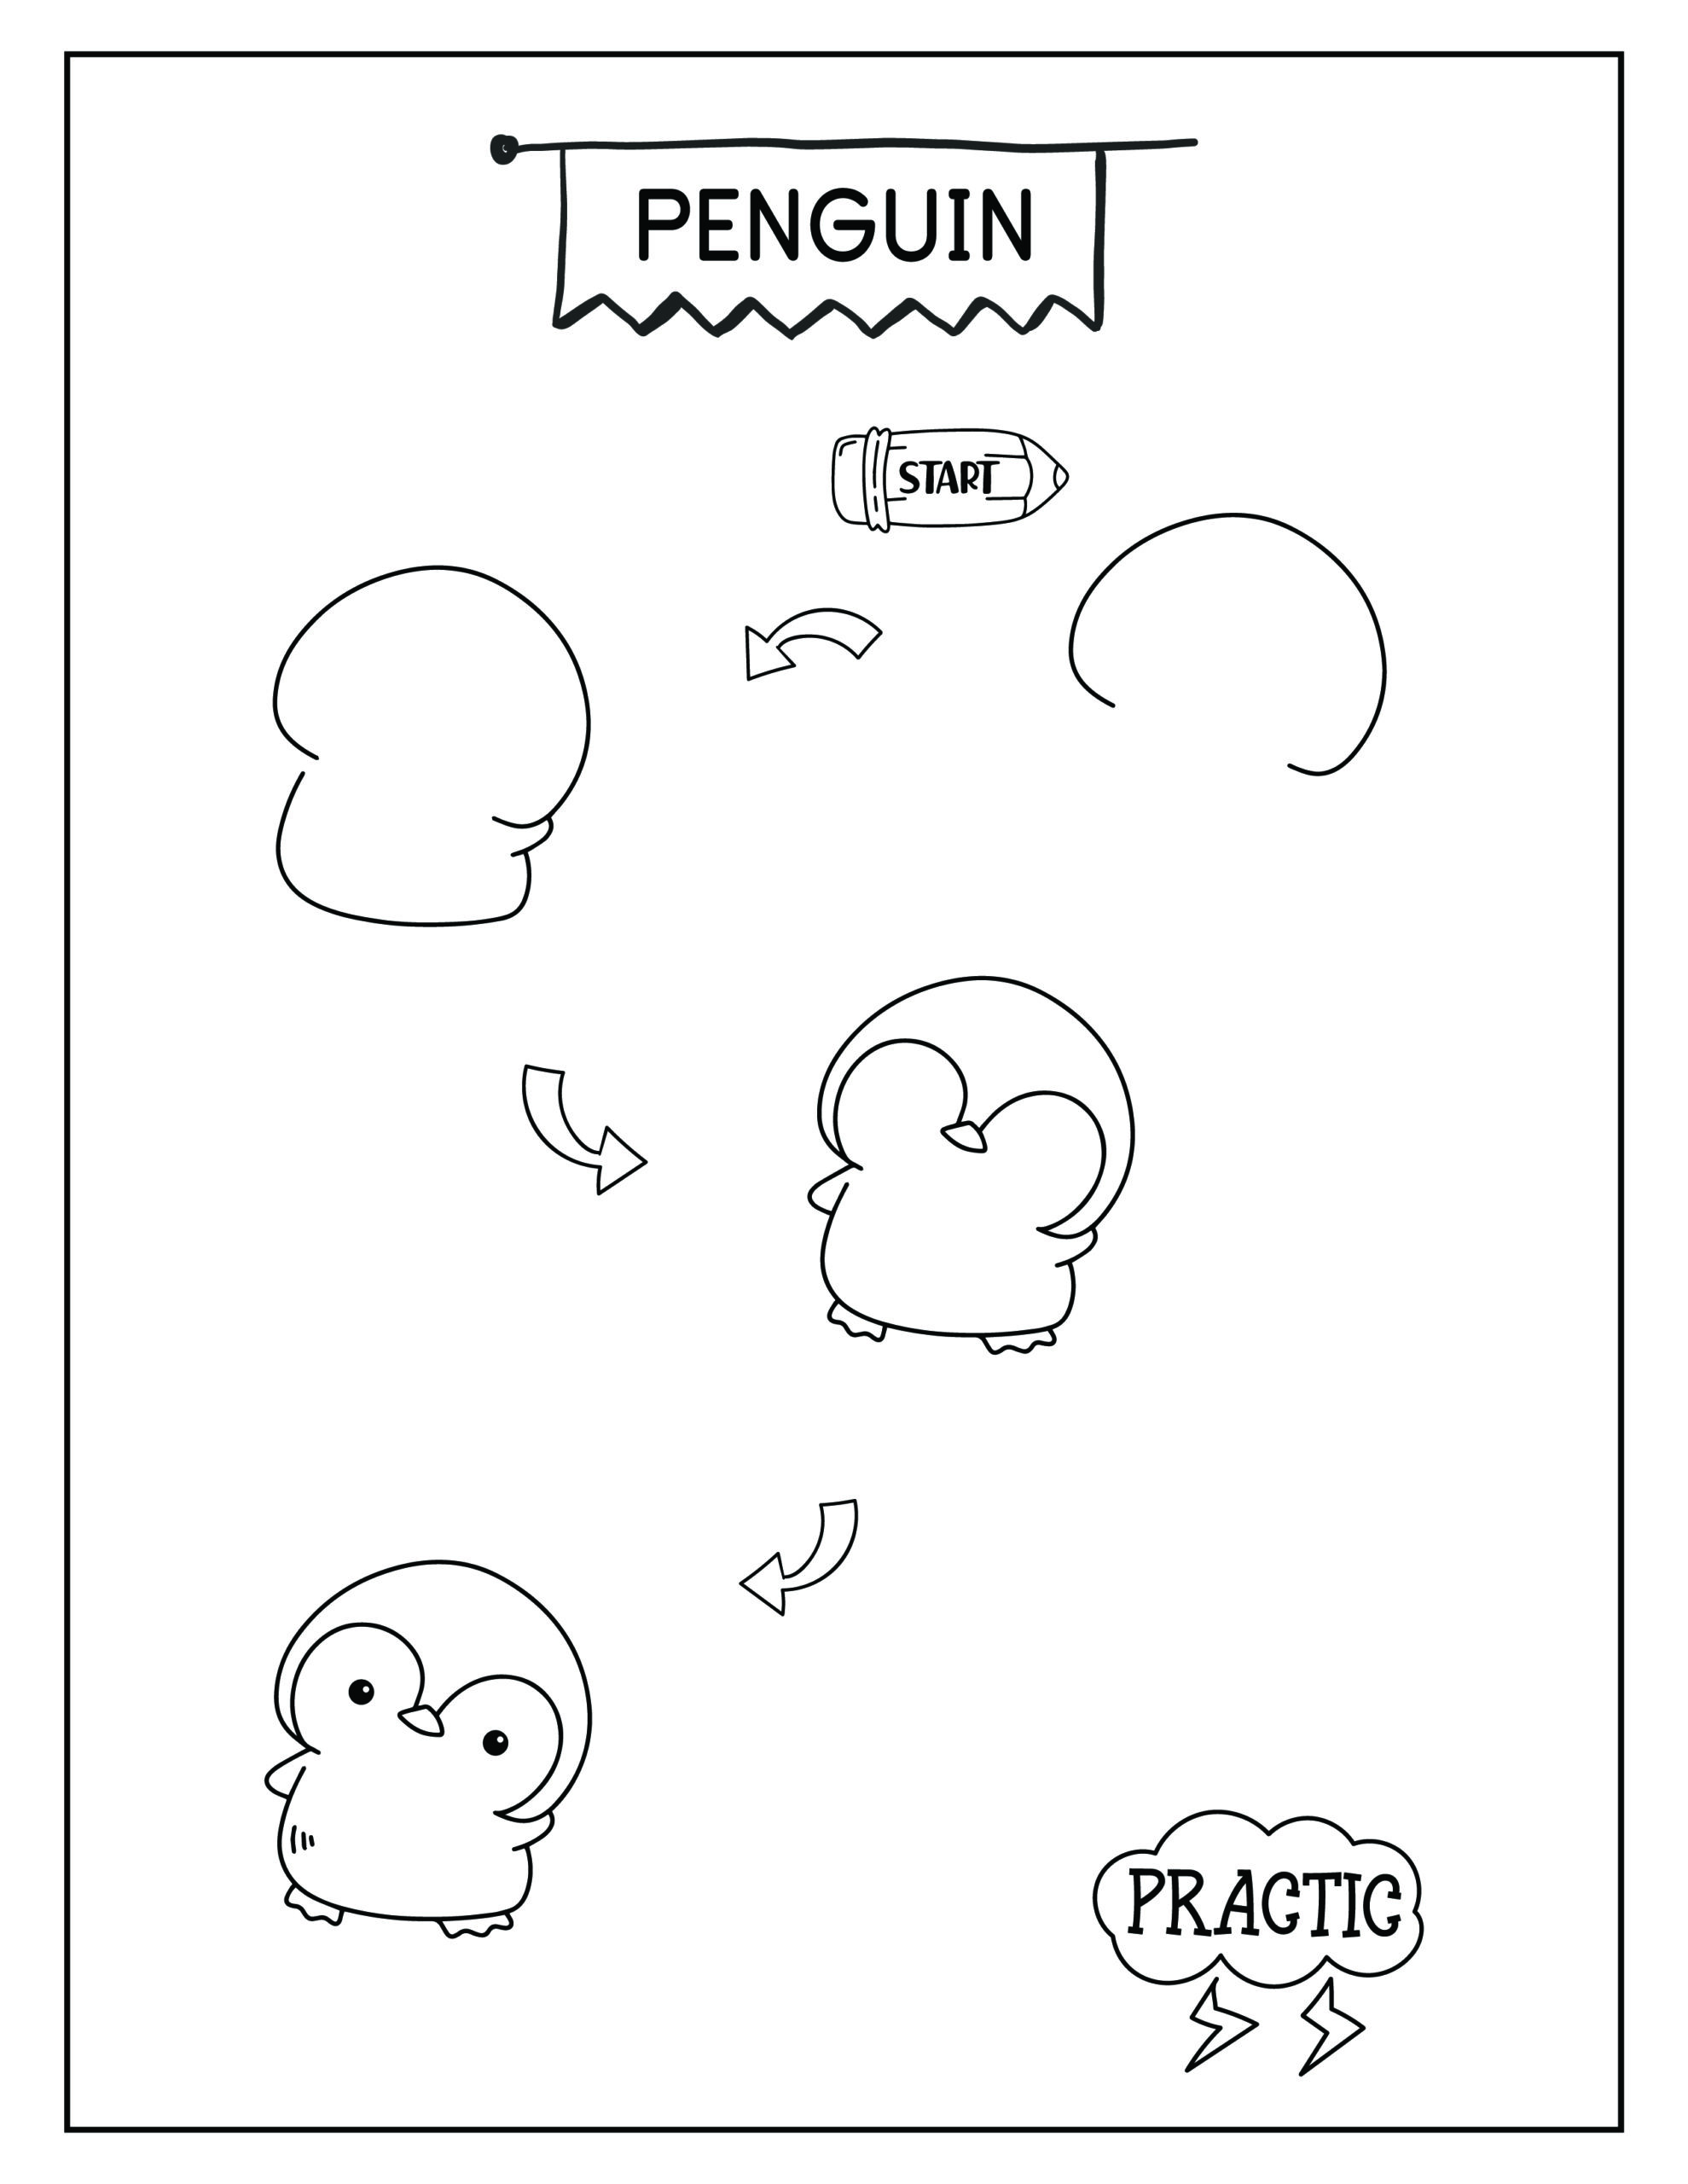
In this section, we’ll guide you through the simple steps to draw Pip the Penguin, an adorable and easy art thing to draw when you’re feeling bored. With just a few basic shapes and some simple details, you’ll be able to create a cute penguin character that’s perfect for doodling and getting creative. Whether you’re a beginner or just looking for a fun, quick drawing project, these steps will help you bring Pip to life on your paper. Let’s get started!

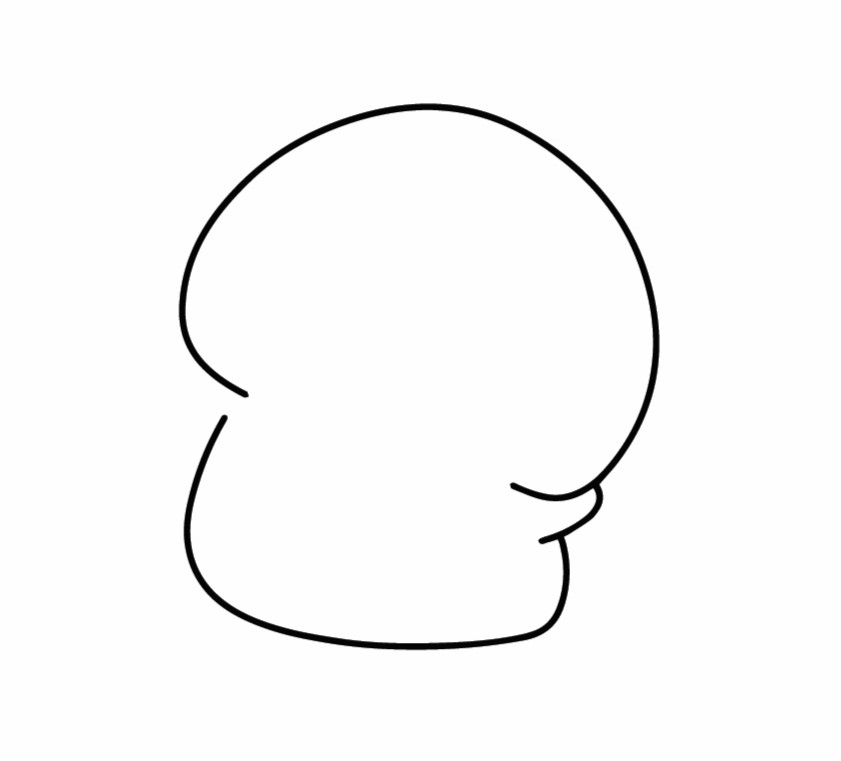
Step 1: Basic Shapes
- Outline the Body: Start by drawing a large, rounded shape that will form the penguin’s body. Think of it as an almost oval shape, but slightly wider at the bottom, like a teardrop.
- Add the Head: On top of the body, sketch a smaller, curved shape for the head. This should be slightly overlapping the body shape.
- Connect the Head and Body: Smoothly connect the head to the body using curved lines to create a seamless transition.
- Prepare for Details: Ensure the shapes are proportionate, as these will be the foundation for adding more details in the next steps.

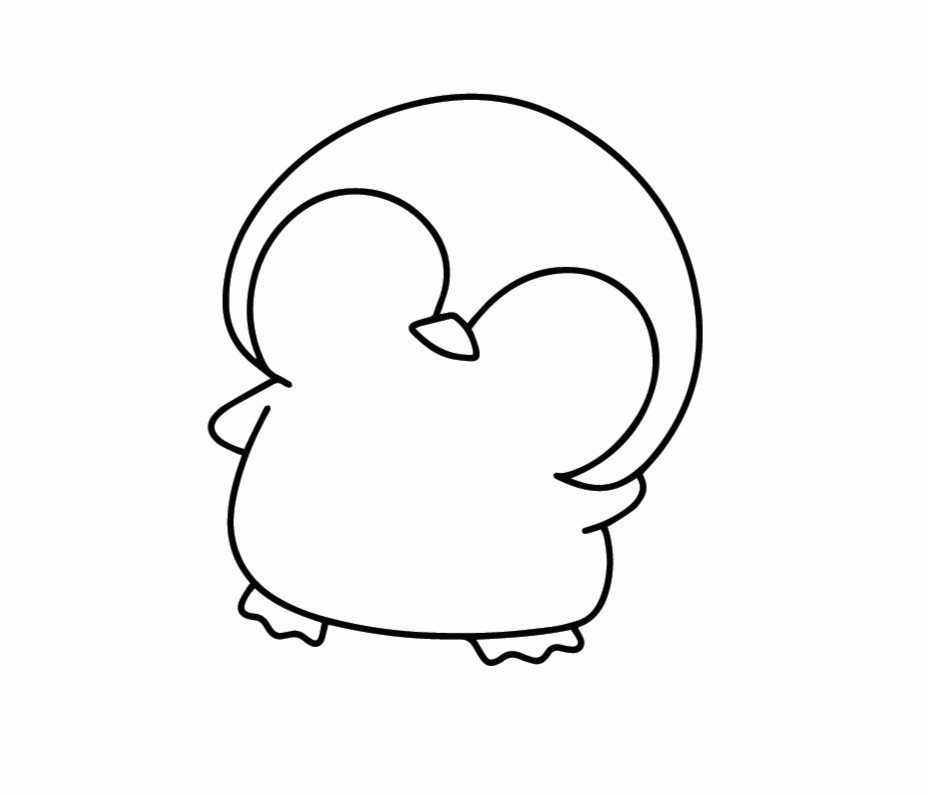
Step 2: Face Features
- Draw the Face Outline: Inside the head shape, draw a rounded, heart-like outline that will represent the white patch on the penguin’s face.
- Add the Beak: At the center of this outline, draw a small, triangle-like shape for the beak. Make it slightly curved for a cute, friendly appearance.
- Sketch the Flippers: On each side of the body, add two small, curved shapes for the flippers. They should look like tiny wings pointing slightly outward.
- Include the Feet: Below the body, draw two short, rounded feet. They should be simple, resembling little webbed toes.

Step 3: Final Drawing
- Draw the Eyes: Inside the face patch, draw two large, circular eyes. Position them slightly above the beak, giving Pip an endearing look.
- Add Pupils: Inside each eye, add smaller circles for the pupils. Leave a tiny white spot in each pupil to give the eyes a shiny, lively effect.
- Detail the Flippers: Add small lines at the tips of the flippers to give them a bit of texture, making them appear slightly feathered.
- Final Touches: Go over your drawing, refine the lines, and erase any unnecessary guidelines. Your Pip the Penguin is now ready!
Drawing Tips for Pip the Penguin
To help you create the best version of Pip the Penguin, here are some helpful drawing tips. These pointers will ensure that your penguin looks as cute and charming as possible, while also making the drawing process easier and more enjoyable.
1. Keep It Round and Soft
- When drawing Pip, focus on keeping the shapes round and soft. The rounded shapes contribute to the cuteness of the character, giving Pip a friendly and approachable look. Avoid sharp angles or harsh lines, as they can make the penguin appear less cuddly.
2. Balance Proportions
- Pay attention to the proportions between Pip’s head, body, and flippers. The head should be slightly smaller than the body, and the flippers should be small but noticeable. Balancing these proportions will give Pip a more cohesive and visually appealing appearance.
3. Add Personality with the Eyes
- The eyes are the most expressive part of Pip. To make your penguin more lively, consider experimenting with the size and placement of the eyes. Larger eyes can make Pip look more innocent, while slightly tilted eyes can add a curious or playful expression.
4. Don’t Forget the Details
- Small details, like the little lines on the flippers or the tiny toes on the feet, add texture and personality to your drawing. These simple touches can make your doodle stand out and look more polished without adding much complexity.
5. Practice Makes Perfect
- If your first drawing of Pip doesn’t turn out exactly as you hoped, don’t worry! The more you practice, the better you’ll get at capturing Pip’s character. Try drawing Pip in different poses or with different expressions to improve your skills and add variety to your doodles.
These tips will help you enhance your drawing of Pip the Penguin, making the process smoother and the end result more satisfying. Happy doodling!
Penguin Expressions Guide for Pip the Penguin
Pip the Penguin is a versatile little character who can show a variety of emotions with just a few changes to the facial features. Below are three different expressions you can try drawing on Pip to give him more personality and charm.
Happy Pip
Happy Pip is full of joy and excitement, with a big smile that can light up the page. This expression is perfect for when you want to show Pip enjoying his day.
How to Draw It:
Eyes: Draw the eyes as two large circles with small pupils slightly looking upward. Add a tiny curved line above each eye to represent raised eyebrows, giving Pip a cheerful look.
Mouth: Draw a wide, curved line beneath the beak to create a big, happy smile. You can even add a tiny line at each end of the smile to make it look broader.
Extra Detail: Add small curved lines near the cheeks to enhance the smiling effect, making Pip look even more joyous.
Curious Pip
Curious Pip is intrigued by something new. His wide eyes and tilted head show that he’s eager to explore or learn more. This expression is great for when Pip is discovering something interesting.
How to Draw It:
Eyes: Draw the eyes as large circles, but this time, make the pupils smaller and position them slightly towards the center or one side, as if Pip is looking intently at something. Add a slight tilt to the eyes to enhance the curious look.
Mouth: Create a small, slightly curved line just below the beak, almost like a tiny smile or a neutral expression. This subtle mouth shape indicates that Pip is focused and thinking.
Head Tilt: To emphasize curiosity, slightly tilt Pip’s head to one side. This can be done by adjusting the angle of the face patch and beak, giving the impression that Pip is leaning in to see something better.
Sleepy Pip
Sleepy Pip is ready to drift off into a peaceful slumber. His droopy eyes and relaxed expression make him look soft and cozy, perfect for a calm and quiet moment.
How to Draw It:
Eyes: Draw the eyes as half-circles, with the flat side facing down, to create a closed or partially closed eyelid effect. Position them lower on the face to suggest that Pip is dozing off. You can add tiny lines above the eyes to represent relaxed, drooping eyelids.
Mouth: Draw a small, curved line below the beak, turned slightly downward to show a relaxed, sleepy expression. The mouth should look gentle, as if Pip is quietly breathing in his sleep.
Extra Detail: Consider adding a tiny “Z” shape near Pip’s head to indicate that he’s snoozing, or draw a little pillow or blanket around him to complete the sleepy scene.
These expressions add a lot of personality to Pip the Penguin, making your doodles even more fun and dynamic. Try practicing these different looks to see how versatile Pip can be!
Avoiding Common Mistakes When Drawing Pip the Penguin
Even with a simple and fun character like Pip the Penguin, there are a few common mistakes that beginners might make. Don’t worry—these mistakes are easy to fix with a little guidance. Below, we’ll go over two of the most frequent errors and how you can avoid them.
Mistake 1: Uneven Proportions
One common mistake is drawing Pip with uneven proportions, such as making the head too large or the body too small. This can make Pip look a bit awkward and less balanced.
How to Avoid It:
Start with Basic Shapes: Begin by lightly sketching the basic shapes of Pip’s head and body. The head should be about one-third the size of the body. If it helps, use a ruler or draw guidelines to ensure the shapes are proportional.
Check Your Work: Before moving on to the details, step back and take a look at your drawing. Make sure the head isn’t too big compared to the body, and that the flippers and feet are in proportion as well.
Adjust as Needed: If something looks off, don’t hesitate to erase and adjust. It’s easier to fix proportions at the sketching stage than later on when you’ve added details
Mistake 2: Misaligned Facial Features
Another common mistake is placing the facial features, like the eyes and beak, too far apart or too close together. This can result in a facial expression that looks unnatural or even distorted.
How to Avoid It:
Use Guidelines: Lightly draw a vertical and horizontal line through the center of Pip’s face. These lines will act as guides for placing the eyes and beak evenly.
Position the Eyes First: Place the eyes on either side of the vertical line, ensuring they are equally spaced from the center. The eyes should be roughly at the same height on the horizontal line, giving Pip a balanced look.
Place the Beak Correctly: The beak should be centered on the vertical line, just below the horizontal line. This positioning ensures that the beak sits naturally between the eyes.
Review and Adjust: Once the facial features are in place, take a moment to review them. If the eyes look too far apart or the beak seems off-center, make small adjustments until everything is aligned properly.
By being mindful of these common mistakes and following these tips, you can create a more polished and accurate drawing of Pip the Penguin. With practice, these tips will become second nature, and your doodles will look even better!
Coloring Techniques for Pip the Penguin
Now that you’ve drawn Pip the Penguin, it’s time to bring him to life with some color! Below are three different coloring techniques you can use: colored pencils, markers, and digital coloring. Each method has its own charm, so choose the one that suits your style or try them all!
Colored Pencils
Colored pencils are a great choice for adding soft, layered colors to Pip. They give you control over shading and blending, allowing you to create a more textured and nuanced look.
How to Use Them:
- Start Light: Begin by lightly shading the areas where Pip’s body would be darker, like the edges of his flippers and the bottom of his body. Use soft, circular motions to build up the color gradually.
- Layer for Depth: To add depth, layer darker colors on top of the lighter base. For example, you can use a light gray as a base for Pip’s body, then layer darker grays or even a hint of blue for shadows.
- Blend Colors: Use a blending pencil or a white colored pencil to gently blend the colors together. This will create a smooth transition between different shades and give Pip a softer appearance.
- Final Details: Finish by adding any details, like the rosy blush on Pip’s cheeks, or the shine in his eyes. Use a sharp pencil for these small areas to keep them crisp and defined.
Markers
Markers are perfect for achieving bright, bold colors that make Pip stand out. They’re great for creating a clean, vibrant look with strong contrast.
How to Use Them:
- Choose Your Colors: Select a set of markers in shades of black, white, gray, and a pop of orange or yellow for the beak and feet. Markers tend to be more vivid, so choose colors that will complement each other without overwhelming the design.
- Color in Sections: Begin by coloring in Pip’s body using broad, even strokes. Work in small sections to avoid streaks and ensure consistent coverage. For a smooth finish, try to color in one direction rather than back-and-forth.
- Add Shadows: Use a slightly darker shade of the same color to add shadows under the flippers, around the beak, and along the bottom of Pip’s body. This will give your drawing some dimension and make Pip look more three-dimensional.
- Outline for Impact: Once you’ve finished coloring, use a fine-tipped black marker to outline the entire drawing. This will sharpen the edges and make the colors pop even more.
Digital
Digital coloring offers endless possibilities with precise control over colors, shading, and textures. It’s a fantastic way to experiment with different looks without worrying about making mistakes.
How to Use It:
- Choose a Software: Use any digital drawing software or app, such as Photoshop, Procreate, or even free programs like GIMP. Start by importing or drawing the outline of Pip on a new layer.
- Create Layers: Work in layers to separate different parts of Pip’s body. For example, create one layer for the base colors, another for shadows, and another for highlights. This allows you to edit each part without affecting the rest of the drawing.
- Select Colors: Digital tools often come with a color picker that lets you choose the perfect shade. Start by filling in Pip’s body with a base color. Then, use a darker shade on a separate layer to add shadows, and a lighter shade for highlights.
- Experiment with Textures: Digital tools allow you to add textures like fur or feather effects easily. Try using different brushes to give Pip a soft, fluffy look. You can also adjust the opacity of your layers to blend colors seamlessly.
- Finish with Effects: Add a soft glow around Pip or play with light effects to make the character stand out even more. Digital tools give you the freedom to add these finishing touches that can really elevate your artwork.
Each coloring technique has its own unique appeal, so try experimenting with them to see which one you enjoy the most. Whether you prefer the traditional feel of colored pencils, the boldness of markers, or the versatility of digital coloring, Pip the Penguin will look fantastic in any style!
