Meet Bendy the Banana: Your New Drawing Buddy!
Who wouldn’t want to draw Bendy the Banana? With his bright yellow peel and quirky personality, Bendy is the kind of character that brings a smile to your face the moment you see him.
He’s got just the right amount of goofiness, making him super fun to draw, especially for beginners. Whether you’re looking to add some fruity fun to your sketchbook or just want to practice your doodling skills, Bendy is the perfect character to get you started. Plus, who doesn’t love a banana with a bit of character? Let’s bring Bendy to life with just a few easy steps
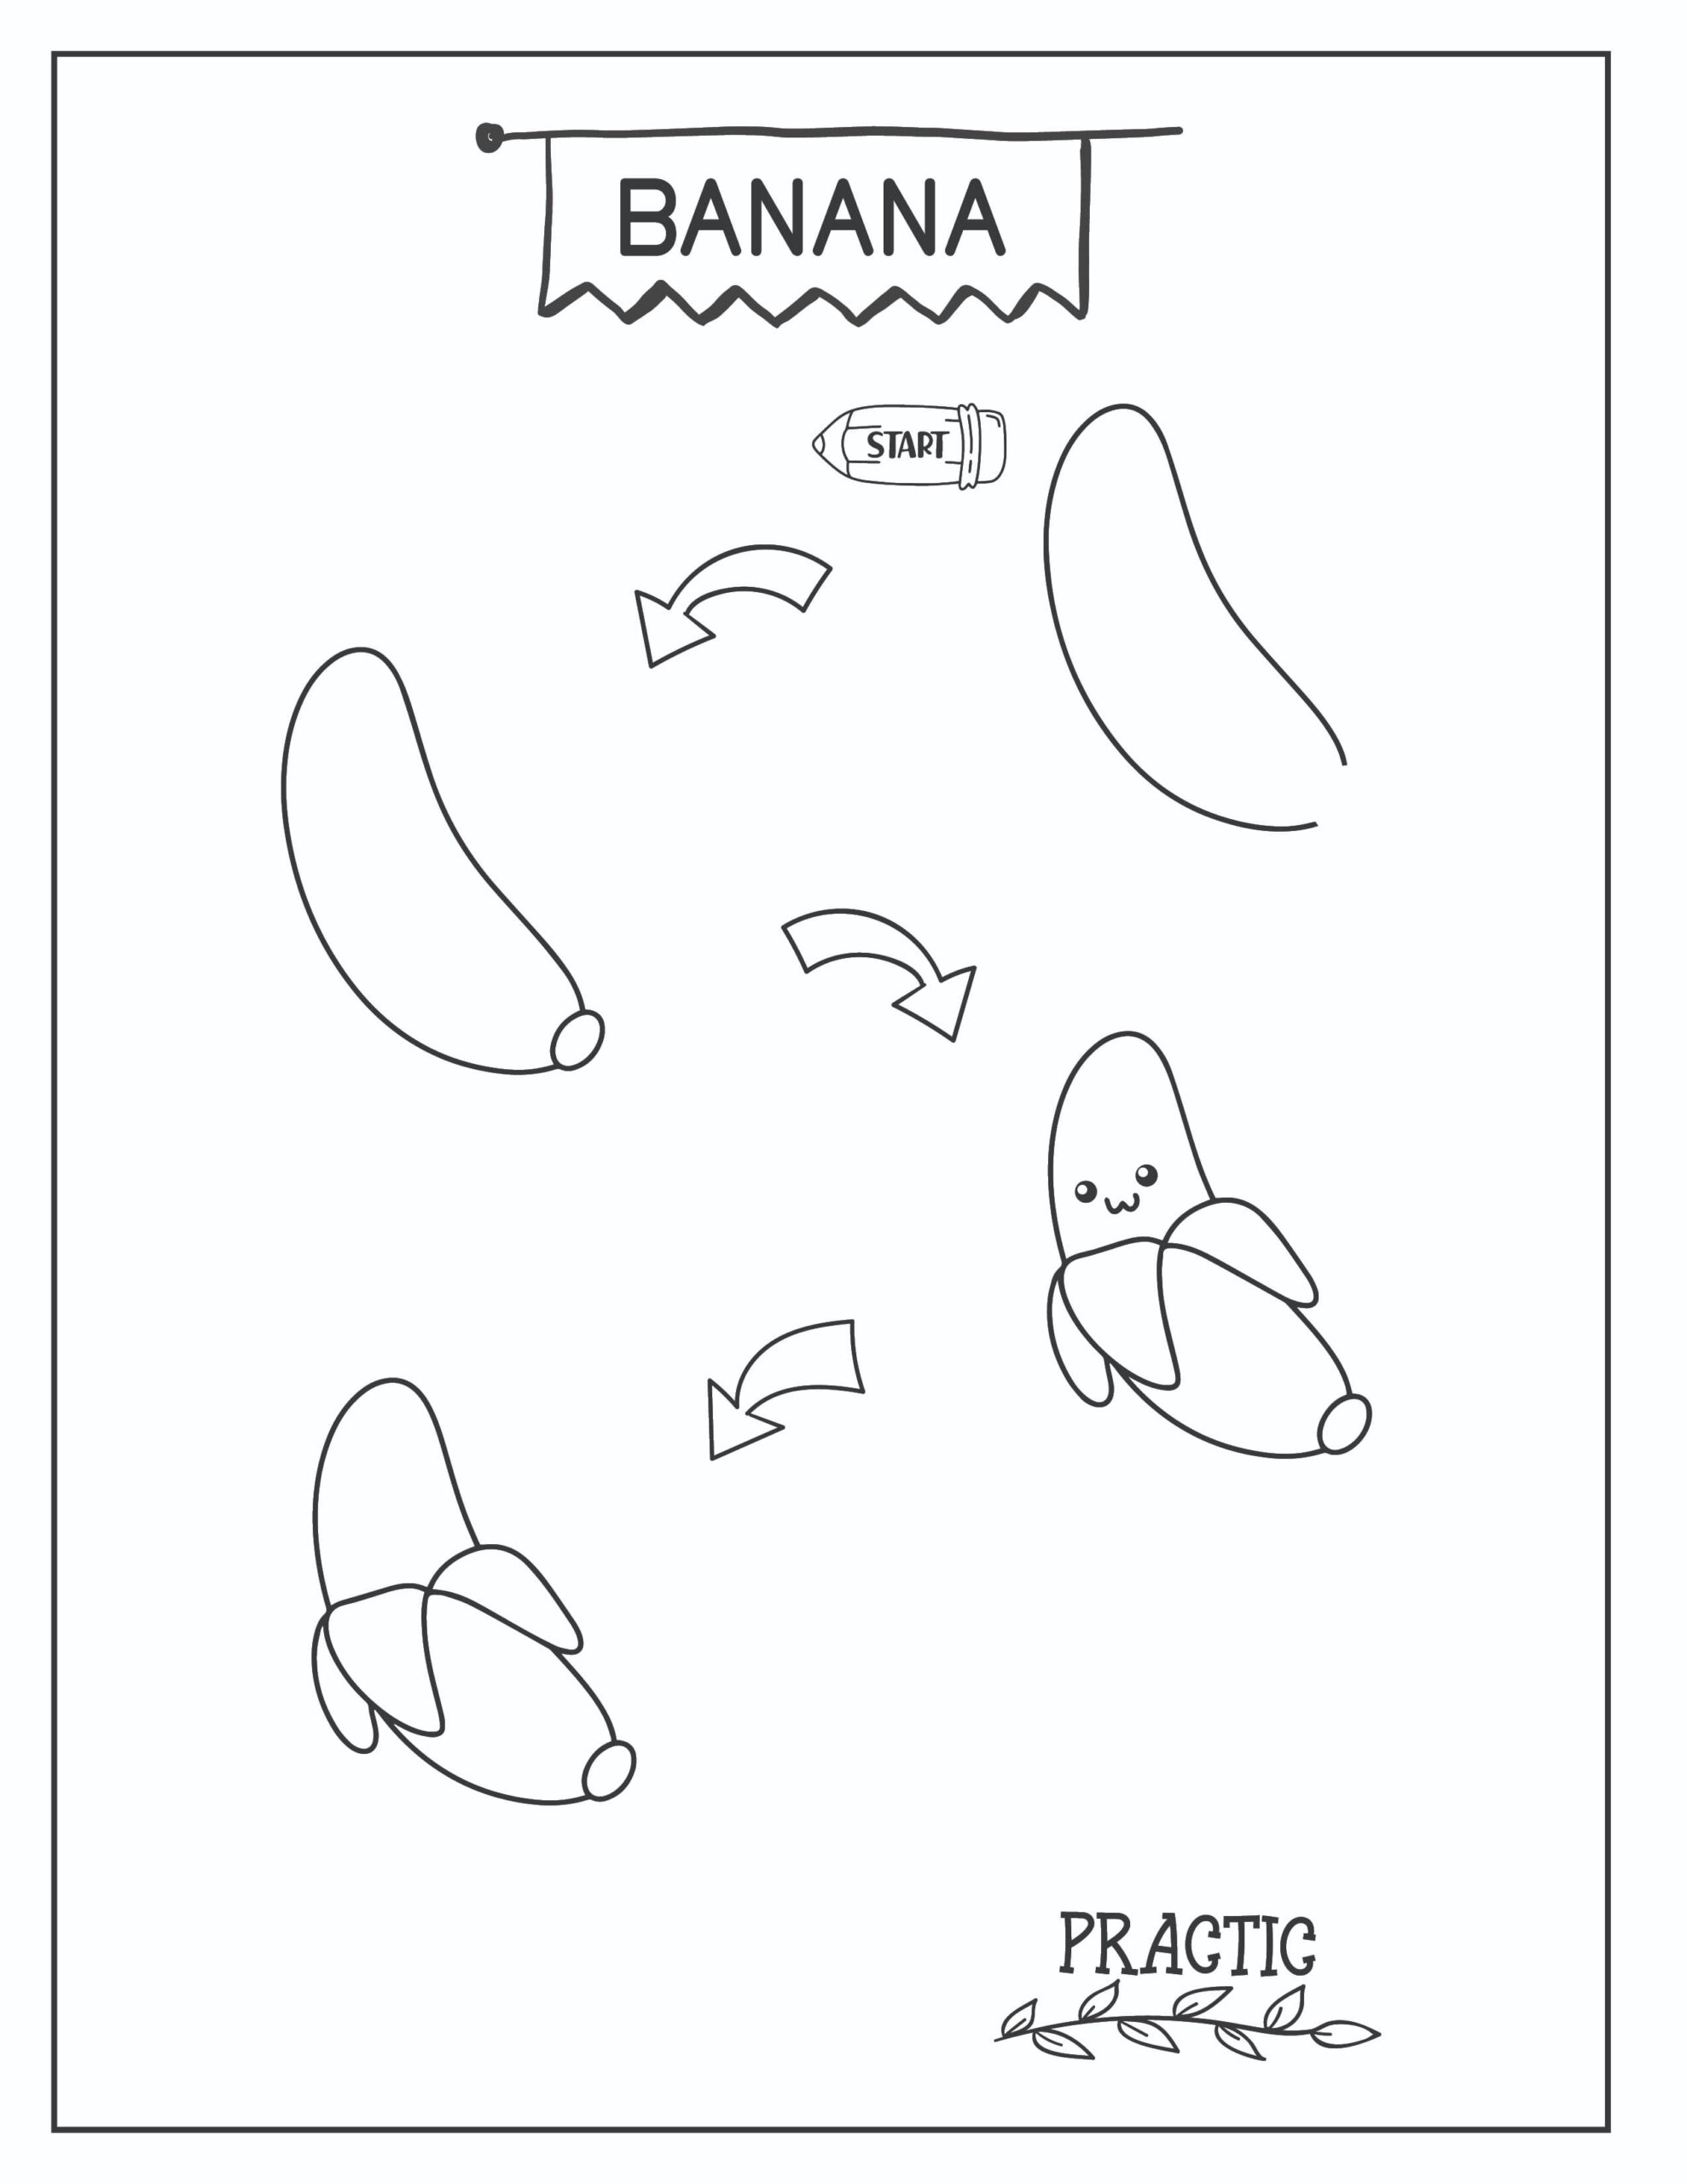
How to Draw Bendy the Banana in Four Easy Steps!
Ready to bring Bendy the Banana to life? With just a few simple steps, you can create your own adorable banana buddy. This step-by-step guide is perfect for beginners and will have you doodling Bendy in no time. Grab your pencil, and let’s get started!
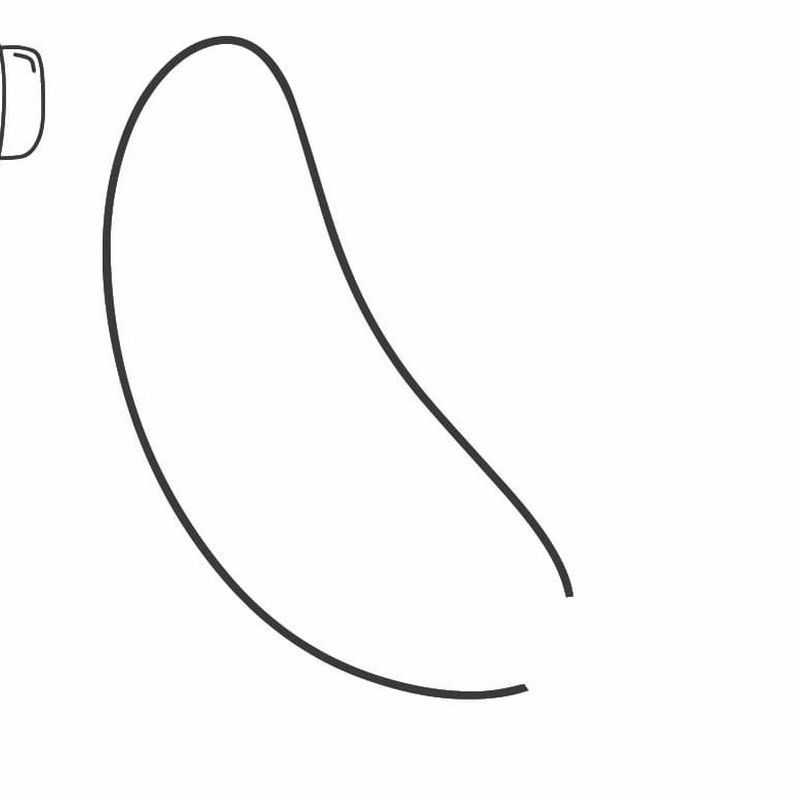
Step 1: Draw the Basic Outline
- Start by drawing a long, curved line, like a gentle “S” shape. This will be the main outline of Bendy’s body.
- Mirror this curve by drawing another curved line parallel to the first one, but make sure they join at the bottom, forming a pointy tip.
- Connect the two lines at the top with a small, slightly curved line to complete the banana shape.
- Your goal is to have a shape that looks like a curved, elongated oval, almost like a banana!
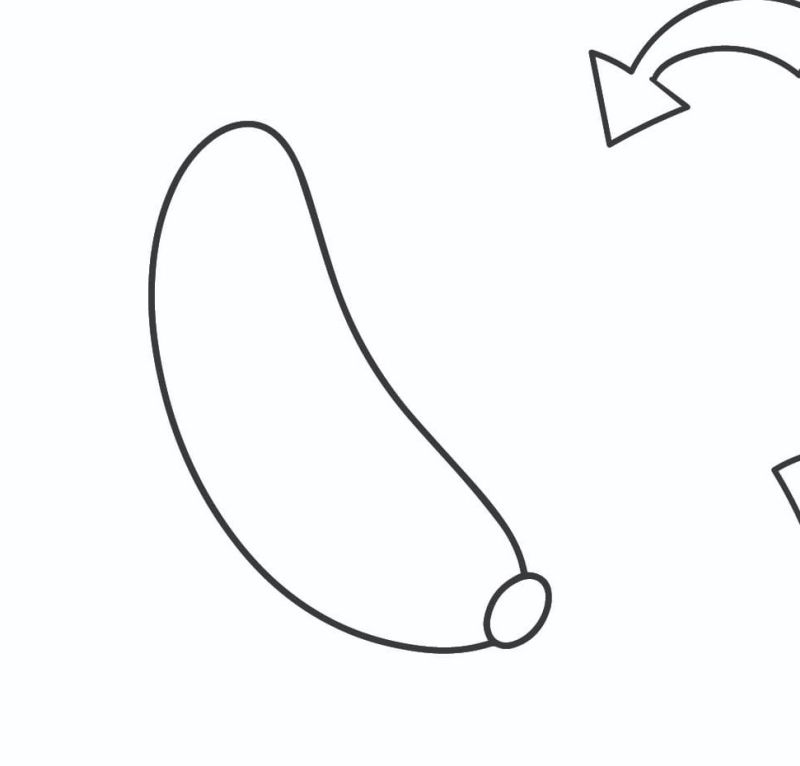
Step 2: Add the End and Stem
- At the bottom of your banana shape, draw a small, rounded oval for Bendy’s end tip.
- For the stem, go to the top of the banana and draw a short, slightly curved rectangle. This should stick out from the top edge.
- Make sure the stem is connected smoothly to the body of the banana.
- Check to see that your banana now has both a clear top (with the stem) and a bottom (with the end tip).
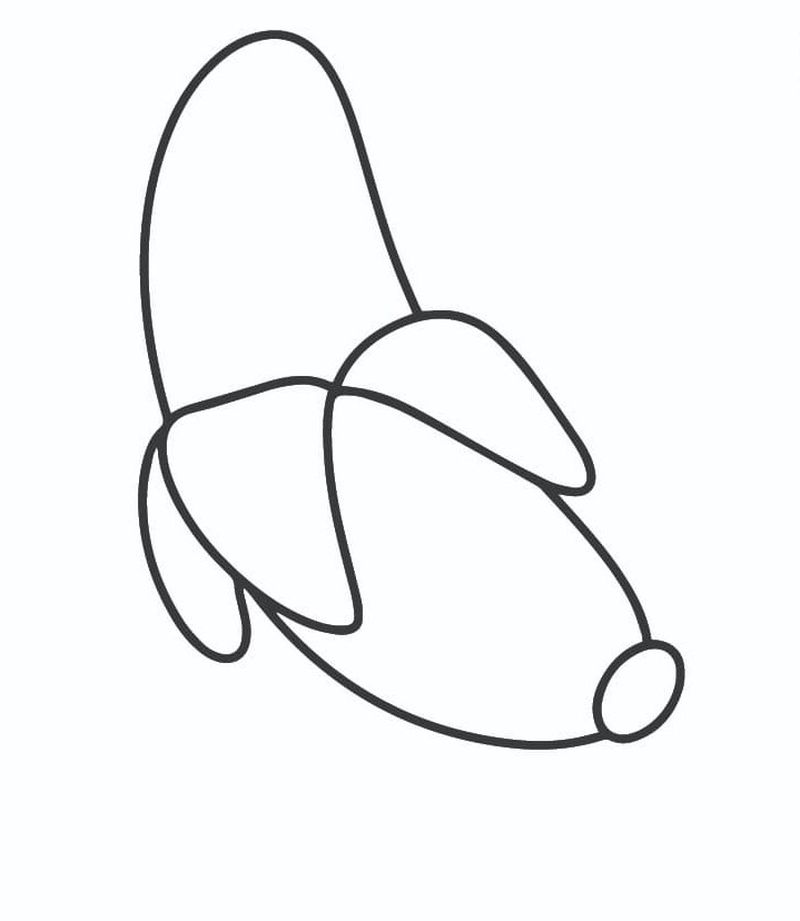
Step 3: Peel it Open
- Draw the first peel by sketching a curved shape that starts from the top middle of the banana, curving down and outward.
- Repeat this process two more times, drawing two more peel sections on each side of the first one.
- These peel sections should look like they’re folding back, exposing the inside of the banana.
- Make sure the peel sections are proportionate and wrap around the body smoothly, following the curve of the banana.
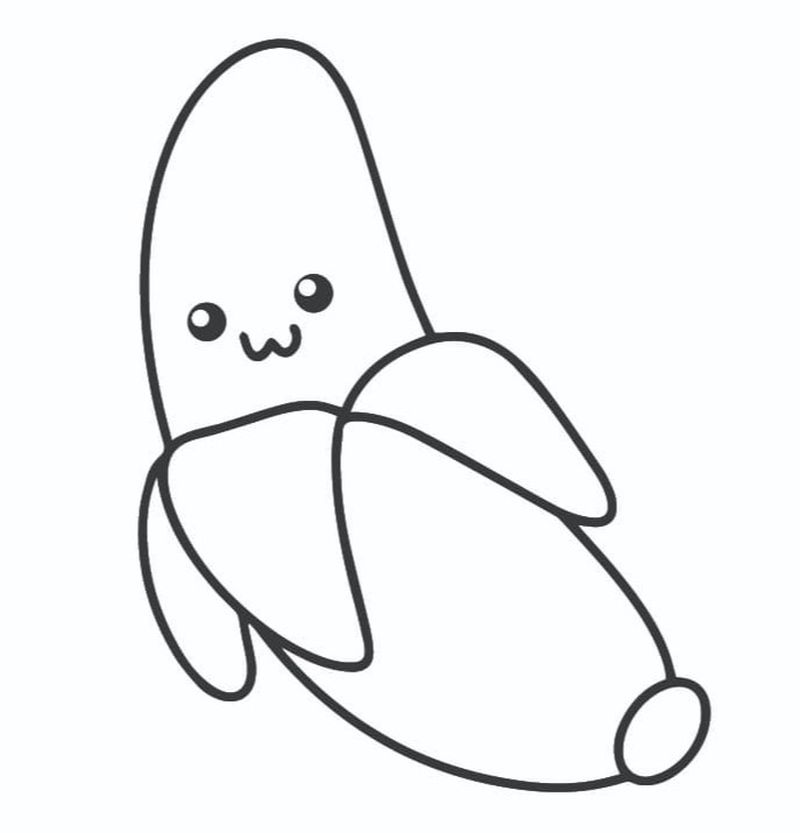
Step 4: Add the Face
- Start by drawing two small circles near the top of the banana for Bendy’s eyes. Place them evenly apart.
- Inside each eye, draw a smaller circle for the pupils to give Bendy that cute, expressive look.
- Below the eyes, draw a small, curved line for the mouth, adding a little upward curve at each end to make him smile.
- Now Bendy has a fun, friendly face that adds personality to your drawing!
By following these detailed steps, you’ll have a cool and quirky Bendy the Banana to show off in no time!
More Drawing Tips for an Even Easier Bendy the Banana
Start with Light Pencil Strokes: When you’re first sketching Bendy, use light, gentle pencil strokes. This way, if you make any mistakes or want to adjust the shape, you can easily erase and redraw without leaving marks on the paper.
Use Basic Shapes as Guides: Break down Bendy into simple shapes before drawing the final lines. For example, think of the banana body as an elongated oval and the peel sections as teardrops. This helps keep your proportions in check and makes drawing the curves easier.
Keep the Peel Symmetrical: When drawing the peel sections, try to make them as symmetrical as possible. This gives Bendy a balanced, appealing look. If one peel section is bigger or smaller than the others, it can make your banana look a bit lopsided.
Practice Drawing the Face Separately: If you find the face a bit tricky, practice drawing the eyes and mouth on a separate piece of paper first. Once you’re happy with the look, apply what you’ve learned to your final drawing. Getting the face right can really bring Bendy’s character to life!
Express Bendy: Fun Facial Expressions to Try!
Now that you’ve mastered drawing Bendy the Banana, why not give him some different expressions? Adding various facial expressions can make your drawings even more fun and personalized. Let’s explore three different expressions that will bring Bendy’s personality to life!
Happy Bendy
Bendy is feeling extra cheerfultoday!
Eyes: Start by drawing two large circles for the eyes, just like before. Inside each eye, add a smaller, filled-in circle at the top to represent the pupils, giving him that bright, excited look.
Eyebrows: Add small, slightly curved lines above each eye to create raised eyebrows. This adds to the happy expression.
Mouth: Draw a wide, curved line below the eyes for a big, happy smile. Add a small curve at each end of the smile to make it look more genuine.
Surprised Bendy
Bendy just saw something unexpected!
Eyes: Draw the eyes larger than usual, making them appear more round and open. The pupils should be smaller and positioned in the center of the eyes to show surprise.
Eyebrows: Draw the eyebrows as two straight, slightly slanted lines above the eyes, as if they’re raised in shock.
Mouth: For the mouth, draw a small, round “O” shape below the eyes to represent a surprised expression. You can add a tiny line beneath the “O” to indicate Bendy’s chin dropping in surprise.
Sleepy Bendy
It’s been a long day, and Bendy is ready to snooze.
Eyes: For sleepy eyes, draw two half-circles or “U” shapes, as if Bendy’s eyes are closed or halfway closed. Position them a bit lower on the face.
Eyebrows: Add gentle, downward-slanting lines above the eyes to give the impression of heavy, tired eyelids.
Mouth: Draw a small, relaxed smile or even a flat line for the mouth, showing that Bendy is feeling drowsy. You can add a small “Z” near his head to emphasize his sleepiness.
These expressions are a great way to play around with Bendy’s personality and add some variety to your doodles. Try them out and see how much character you can give to your banana buddy!
Avoiding Common Mistakes: Make Bendy Look Just Right
Drawing Bendy the Banana is fun and easy, but there are a couple of common mistakes that can happen along the way. Don’t worry—these are easy to fix! Let’s look at two mistakes that beginners often make and how you can avoid them to keep your Bendy looking perfect.
Mistake 1: Wobbly or Uneven Peel Sections
One common mistake is drawing the peel sections unevenly or with wobbly lines. This can make Bendy look lopsided and less polished.
How to Fix It: When drawing the peel sections, try to keep your lines smooth and consistent. If you’re having trouble, lightly sketch the basic shape first before committing to darker lines. Ensure that the peel sections are roughly the same size and curve outward symmetrically from the center. Practicing this a few times on scrap paper can help you nail the look before adding it to your final drawing.
Mistake 2: Overcrowded Face
Another mistake is placing the eyes, mouth, and other facial features too close together, which can make Bendy’s face look cramped and less expressive.
How to Fix It: To avoid overcrowding, start by lightly sketching where you want each feature to go. Keep a bit of distance between the eyes, and make sure the mouth has enough space beneath the eyes to look natural. If you feel like the features are too close, don’t hesitate to erase and adjust them. A balanced, well-spaced face will make Bendy look more lively and expressive!
By watching out for these common mistakes and knowing how to correct them, you’ll have an even easier time creating a Bendy that looks just right. Happy drawing!
Bringing Bendy to Life: Fun Coloring Techniques
Now that you’ve drawn Bendy the Banana, it’s time to make him pop with some color! Whether you’re using colored pencils, markers, or digital tools, each technique brings its own unique flair to your drawing. Let’s explore how you can use these methods to add some vibrant personality to Bendy!
Colored Pencils
Colored pencils are perfect for creating soft, blended shades that give Bendy a more textured and detailed look.
Start with Light Layers: Begin by lightly coloring Bendy with a soft yellow shade. Don’t press too hard at first; instead, build up the color gradually with light strokes.
Blend for Depth: To add depth, use a slightly darker yellow or even a bit of orange to shade the areas where the peel curves or where you want shadows. Blend the colors together using circular motions to create a smooth gradient.
Add Highlights: For a final touch, use a white pencil or an eraser to add highlights to Bendy’s peel, especially along the edges. This will make your banana look shiny and realistic.
Markers
Markers are great for achieving bold, vibrant colors that make Bendy stand out.
Choose Bold Colors: Start by coloring Bendy with a bright yellow marker. Markers tend to be very pigmented, so one layer should give you a strong color.
Watch for Bleeding: Be careful not to go over the lines too much, as markers can bleed. Work slowly and use a fine tip marker for detailed areas like the peel edges and Bendy’s face.
Layer for Shadows: Use a darker yellow or orange marker to add shadows, especially under the peel sections. You can layer the colors by going over the same area twice for a deeper shade.
Digital
If you’re working digitally, you have a lot of flexibility and control over the final look of Bendy.
Base Layer: Start by using a solid yellow color to fill in Bendy’s body. Digital tools allow for clean, even color application with no streaks.
Add Shadows and Highlights: Use a slightly darker yellow for shading the curves and a lighter yellow or white for highlights. Digital tools like brushes and gradients can help you achieve smooth transitions between light and dark areas.
Experiment with Effects: Try out different effects, like adding a soft glow or texture to Bendy’s peel. You can use layers to experiment with different looks without affecting your base drawing.
By using these coloring techniques, you can bring out the best in your Bendy the Banana drawing, making it as vibrant and unique as you are! Whether you prefer the softness of colored pencils, the boldness of markers, or the precision of digital tools, there’s a coloring method that’s just right for you.
